A media collection resource in Moodle is very similar to a Moodle lightbox gallery, except that it is more flexible, allowing audio and video items to be added to galleries as well as images. Instructors can also use this tool as an activity, which students can use to create and contribute to assessable galleries.

A media collection in Moodle: this collection contains 2 galleries, and has been made available for students to add more galleries.
View a Gallery Within a Media Collection
To view a gallery within a Media Collection:
- On the course home page, click the media collection's link.

- Click the gallery that you want to view.

- Navigate through the items in the gallery using the scrolling arrows on either side of the gallery display.

- Once in lightbox mode you can Like, leave Comments, and navigate through the gallery by clicking the thumbnails.

- Click the Return icon
 at the top of the page to return to the media gallery thumbnail page.
Comment on a gallery
To comment on a gallery:
- Open the gallery.
- Click Comments below the items in the gallery. Enter your comment in the Comments box and click Save comment. Your comment will display below the gallery items.

- To delete your comment, click the X at the right of the comment.

Note: Comments on individual media items can be made using the Media Comments feature.
Create a gallery and add an item to it
You may need to create a gallery within a collection, before you can upload an image, video or other file. (Your instructor determines which type of files you are allowed to add to a gallery.)
To create a gallery within a media collection:
- On the course home page, click the media collection link.
- On the collection's home page, click Add a gallery.

- On the resulting page,
-
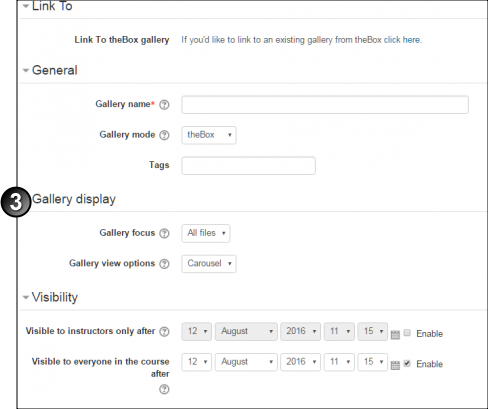
- In the General section enter a Gallery name.
- Select a Gallery Mode:
- theBox mode allows users to add any file content they wish. Content will be stored in theBox.
- YouTube: in this mode, only YouTube videos can be added.
- In the Gallery display section, users can alter the Gallery Focus, which allow users to determines what file types are presented in the gallery by default, and change the Gallery View Option (Carousel or Grid).
- In the Visibility section (to instructors and to others). Visible to instructors only after allow instructors to access your user’s gallery before all other users. Visible to everyone in the course after is to allow other users to view user’s gallery after the specified date. If you will be submitting the gallery only to your instructor as part of an assessment, leave the Enable check box for Visible to everyone else in the course after unselected.
- Click Save changes. Your empty gallery will be displayed on the collection's galleries page.
-
To add files into your new gallery (theBox mode galleries):
- In the collection page, click the Edit icon for the gallery you want to begin adding items to and choose Edit gallery.
- In the gallery, click Add File(s) to add files into the gallery.

- On the resulting page, choose the Copyright setting you wish to apply for the files you are uploading. Then click Select your file or drag and drop the files into the drop box. Click Save. To upload multiple items use the drag and drop method, select multiple files and dragging them all at once.

- Your gallery will display the items you recently uploaded.

Edit Media Items
- To edit media items, go to the collection page. Click pencil icons to edit your files.

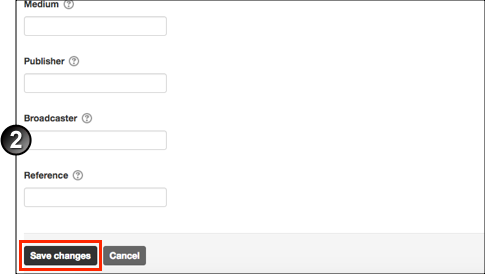
- In the General Section:
- Enter a Caption for the item, which will be displayed alongside the item.
- Add any Description necessary.
- Item Display specifies if you want the file to be displayed, and Use as thumbnail for the gallery specifies if you want the item to be displayed as thumbnail.

- In the Advanced section, complete all the relevant fields.
- Click the Save button. The item displays with its thumbnail and caption on the galleries page.
Add supporting files to a media gallery and view them
Users can upload supporting documents such as a Word or PDF file that describes the work(s) being submitted. These documents will be listed in the carousel or thumbnail view page.
To add supporting files:
- On the course home page, click the media collection's link.
- In the collection page, click the for the gallery you want to begin adding items into and click Edit gallery.

- On the gallery's home page, click Add File(s).

- On the resulting page, choose the Copyright setting you wish to apply for the files you are uploading. Then click Select your file or or drag and drop the files into the drop box. Click Save. Your gallery will display the items you recently uploaded.

- To view supporting document, click View Galleries. The supporting document file will be displayed alongside other Other Files section.
Submit a Media Collection as an Assignment
Submit via the Media Collection
- You may only submit one gallery per assignment, so make sure all the content you want to submit (images, audio files or video files) is contained in one gallery.
- On the course home page, click on the media collection link.

- Click Add a Gallery.

- In the preceding page, fill in the necessary information in the ‘General’ and ‘Gallery display’ section. Then, click Save Changes.

- In the preceding page, select Add Files to start adding items into your gallery.

- Choose the Copyright setting for the files you are uploading. Either Select your file or drag and drop the files into the drop box. Click Save. To upload multiple items, use the drag and drop method, select multiple files and dragging them all at once.

- Return to the Assignment page. To return, click on the link as highlighted red in the image below.

- After adding files, click "submit assignment" on the gallery page.

- On the edit submission page, acknowledge the declaration and choose the gallery you wish to submit in the Gallery section.
- If your instructor has allowed you to add files or text as part of your assessment, open the File submissions and/or Online text sections and add this material.

- Click Save changes. The Submission status page will be displayed and click Submit Assignment to submit assignment.

- On the preceding page, acknowledge the declaration. The Submission status page displays.

Note that the Gallery can no longer be deleted after a submission has been made to the Media Collection assignment.
Submit via the Assignment link
Note: You can only submit one gallery per assignment, so make sure that all the content you want to submit (images, audio files or video files) is contained in one gallery.
- On the course home page, click the assignment link.

- On the assignment submission page, click Add Submission.

- On the Edit submission page, in the Media collection section, select the Gallery you wish to submit. If your instructor has allowed you to add files or text as part of your assessment, open the File submissions and/or Online text sections and add this material.

- Click Save changes. The Submission status page displays.
- Click Submit assignment and check the box for the appropriate declaration of originality, and click Continue.

Managing video assessments
Assessments in courses go beyond just essays and examinations. Several other forms of assessments such as portfolios, podcasts, sound bites and videos etc. may be used by instructors in your courses. This guide will provide you with some important tips and suggestions that can be used when managing assessments involving videos.
- Instructors may allow you to prepare a short video and upload it to Moodle as a trial. This video maybe a short introduction on the main assessment or any other subject the instructor may deem relevant. The main purpose of this is so that you are able to experience the video recording, editing and uploading experience before venturing on the main task. If the instructor has not setup or allowed for test video preparations, request them to facilitate this.
- Ensure that you have a reliable and high-speed internet connection when either recording/editing videos online or when submitting the assignment to Moodle. If you do not have fast and reliable internet connection at home, use the internet connection at the UNSW campus. UniWide is the wireless network available for current students and can be accessed from a wide range of locations across the campus. Any wifi-enabled device that supports WPA wireless security can be used to connect to UniWide. To find out more details about the network visit the IT’s webpages here.
- After you have recorded the videos, you can use the free and open source Handbrake software to convert your videos to a standard web-optimised format, with default settings. This will help eliminate common issues such as:
Potential Issue 1: Videos have been created as an unusual file type or non-standard resolution. This can occasionally lead to videos being frozen during processing.
Potential Issue 2: You may be asked to upload the video files to media collection galleries in Moodle. These videos are stored in theBox and not Moodle and if these are large files, it can take a very long time to upload. Depending on the internet connection upload speed, this can cause the web browser to time out and the upload will fail. Even if the upload is successful, theBox then has to process the quality down to a web-optimised size for viewers to have a good experience. This means the advantages of uploading a high-quality video is lost, but also means the processing will take longer than normal.
- Converting a video to a web-optimised standard reduces the likelihood of a technical failure and can significantly reduce the time required to upload and process a video file. Note that the Handbrake software is a suggestion only and is neither owned or supported by UNSW. To find out more about the software, look for community support and/or download it directly from the website, please see: https://handbrake.fr.
Instructions to use Handbrake
- Install Handbrake to your device.
- Open Handbrake and click Open Source to select the video.
- Once the file is selected, check the following settings
-
Destination - This controls where the new file will be saved on your computer, change if needed.
-
Format - Select MP4 File.
-
Web optimized - Ensure this is ticked.
-
Video encoder - Ensure this is H.264 (x264)
-
- Click Start when ready.

Once the file is optimised, it can be uploaded to Moodle.